It’s undeniable that JIRA is among the big names in project management tools today. It was initially designed to cater to the methodology needs of software developers. Despite that, the platform has been an efficient solution for organizing tasks and deliverables for various kinds of industries. Whether you’re looking for a new project management tool or you’re searching for an easy-to-follow JIRA tutorial, then this article is what you need. We’ll share everything you need to know about the program and teach you how you can use it for managing your projects.
What Is Jira?
Jira is a highly customizable and centralized project management platform. It allows multiple users to log projects into a central database. Every item can go through several processes or workflows. A manager can use the workflow to organize the status and rules of a project. Gartner previously reported that the Jira tool is considered by many as one of the best project management platforms available today. The report further states that it is ideal for those who are running both conventional and agile projects. So, it is not surprising why it is quite popular around the world.
How Can Teams Use Jira for Project Management?
With 20% of adults working from home in the US, companies need to find an efficient tool for collaboration and managing projects. What’s great about Jira is it allows users to configure its features according to the requirements of a project. No matter how simple or complex your initiatives are, you can customize its settings to suit your needs. Here’s a Jira overview on what you can expect from the tool:
Boards for Projects
Project managers can use the board as a home base for monitoring all of the work items under their team’s bucket. They can determine their workflow and organize them according to the status of the task. There are plenty of available templates to choose from. Even so, managers can still customize the board to suit their preferences.
Jira Issues
In Jira, tasks are also referred to as “issues,” and they live on project boards. Every unit of work can be represented by an issue which contains all important details, including deployment status, attachments, subtasks, and info from integrated apps, among many others. This is why exporting issues from Jira serves multiple critical purposes in project management.
Reporting
Once managers get all project details in one board, they can generate reports to monitor progress and productivity. They can review summaries to see upcoming issue due dates, recent activities, and other information that will give them an overview of where a project is going. Reports can also be customized according to popular issues, open issues, or specific members of the team. In any case, managers can add features that will provide them with a deep insight into a project.
Subsections or “Components”
If you’re running a project that is a bit more complex, you can break them into subsections or “components”. You can use this feature to list several issues under a project, coordinate items between various groups, or assign team members to new issues that come up in the middle of a project. Moreover, components can let you organize several different phases and aspects of a project. For instance, if you’re launching a website, your project will need design, development, content writing, and marketing. You can simplify organization by putting the items under various components. What’s more, you can create reports that are based on specific components.
Subtasks
If you want to make complex issues easier to handle, you can divide them into different subtasks. You can treat every subtask as an individual issue that you can assign to specific team members. You can even set deadlines and add other customizations to give each subtask its own workflow. By using subtasks, it will be easier to evaluate the progress of a project. Anyone coursing their project management in Jira will discover that the tool helps them budget their time efficiently. It will help them dissect every possible step for an issue, breaking the project into smaller, achievable steps.
Associations
You can create an association between two issues by linking them in Jira. You can add associations, such as “blocks,” “duplicates,” and “relates to.” Doing so will allow members of your team to understand how issues under a projected are connected. For instance, if an issue “blocks” another one, they’ll know that the project can only move forward once they’ve dealt with the first issue. What’s more, you customize the links to add relevant information to your project.
Flexible Permissions
Admins managing more mature projects can use permissions to identify team members who can perform certain actions on tasks. You can choose who can assign and edit items. Of course, you can also change permissions mid-project. Managers can also determine permissions based on security. For instance, if you want to limit certain sets of issues to a select, trusted few, then you are free to do so. Other members will be able to see the project as a whole, but certain items and issues will be hidden from them.
It’s worth noting that this feature is useful for teams that employ short-term contractors or freelancers. Managers won’t have to reveal company-sensitive information to part-time workers. Moreover, it can prevent the project’s interface from getting cluttered.
How to Create a Project on Jira
Using the tool may seem daunting at first, but our Jira tutorial will show you the basics you need to know to manage your projects. Since this article is practically a ‘Jira for dummies’ guide, we’re going to use Jira Software Cloud as an example.
First Step: Creating a Project
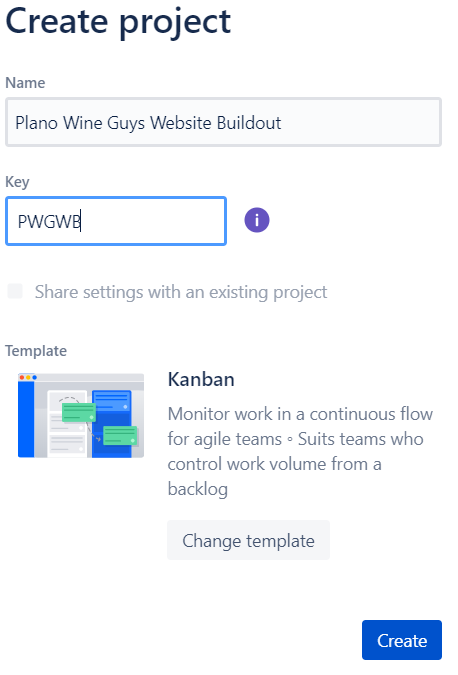
If you don’t have an account on Jira yet, the first thing you need to do is to create one. As a first-time user, the platform will ask you questions regarding your project. If you choose to answer them instead of skipping them, Jira will provide you with suggestions on what type of template is ideal for your needs. You can select from the recommended templates, then choose a name for your project:
On the other hand, if you already have an account and you’re creating a new project, you should see this on your dashboard:
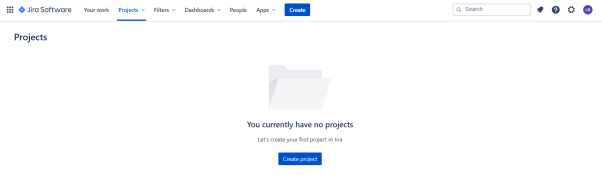
To get started, you can click Create Project on the middle of the page or go to the menu at the top to click Create.
Second Step: Selecting a Template
By using a template to manage your project, your team can get started quickly. You can easily configure the default settings and features to suit your needs. In Jira Software Cloud, you can access two types of project templates—Classic and Next-Gen.
If you’re familiar with Jira Software, then you can opt for one of the Classic templates. They have all the advanced customizations and flexible features most teams want. On the other hand, if you want a simplified project management experience, you can select one of the Next-Gen templates.
Here are the options:
Classic Templates
Scrum

The Scrum template is ideal for agile that work projects based on backlogs. This is perfect if you plan and estimate timelines n sprints while delivering results on a regular schedule.
Kanban
If your team monitors work in continuous flows instead of sprints, then the classic Kanban template is perfect for your needs. You can work off backlogs, but this template focuses more on In-Progress items.
Bug Tracking
If you prefer managing tasks and bugs in list view, this is the ideal option.
Next-Gen Templates
Scrum

If you want to set up your board quickly with less configurations, the Next-Gen style Scrum template is what you need. You can still complete tasks in sprints, but the experience is simplified.
Kanban

If you prefer managing tasks and issues on a continuous flow without being bound by time, then a Kanban template is ideal for you. The Next-Gen style templates also provide a simplified experience.
Third Step: Setting Up Your Columns
Your board will show you various issues from all the projects you handle. It will provide you an efficient method for monitoring, managing, and assessing your tasks. There are plenty of things you can do when it comes to configuring your board. However, for now, we recommend that you set up columns. Also, before you proceed, you need to look at the bigger picture and assess what type of board will reflect the way your team works. Here’s how to set up columns:
- Go to the project menu on the left, then select Kanban board (for Kanban projects) or Active Sprints (for Scrum projects) to access your team’s board.
- Now, go to the top-right corner and click the More icon. It should look like three horizontally aligned dots.

- Click Columns from the options.
- To add a column for each phase in your team’s process, select Add Column.
For instance, if a task needs to pass through quality assurance before you can push it to the Done column, you can insert a column labeled ‘Quality Assurance’.
Fourth Step: Creating an Issue
As we’ve mentioned, issues are among the integral features of Jira. They can be anything from a bug, an epic, a story, or any task in your project. Here’s how to create an issue depending on the type of board you use:
Scrum
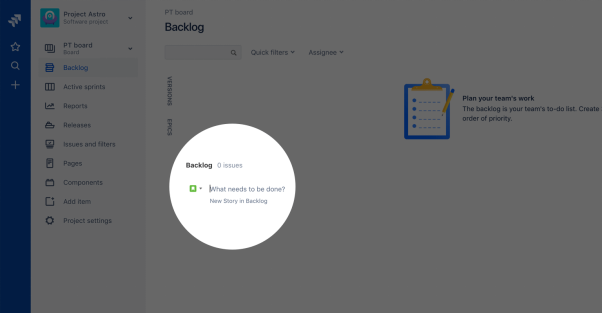
- Go to the project menu on the left, then select Backlog from the options.
- You can also click + Create Issue to start adding tasks or items to your team’s backlog.
Kanban
- Go to your Kanban board, then click the + icon on the left.
- The new issue or item will be displayed under the Backlog column.
Fifth Step: Inviting Team Members
Once you’ve set up your board, you can start inviting team members to work on your project. Here are the steps:
- Go to the project menu on the left, then click Project Settings.
- Under Project Settings, click People.
- On the top-right corner of the page, click Add People.
- Now, add your team members by submitting their email addresses.
From here, all you need to do is ensure that you add detailed descriptions and comments to every issue. This way, team members assigned to a task will know what’s going on and what needs to be done. Learning how to use Jira as a beginner is easy, especially since the cloud software version has a drag-and-drop feature. Once an issue has been resolved, you can move it to the next column.
Bonus Tip: If you want to maximize your team’s productivity under an ongoing project, let them use Traqq alongside Jira. This time tracker can work both offline and online, simplifying the monitoring process. You will be able to identify productivity leaks and issues that take too much time to handle. This way, you can determine if certain items on your board are assigned to the wrong people.